Chroma key is a technique that allows you to composite two images or layers together by removing a specific color from one layer to reveal the layer behind it.Most often you use chroma keying to separate a blue or a green screen from a video and replace it with a different background.Chroma keying is often used on television in weather reporting and films where virtual backgrounds are used.
It is important to set up a blue or a green screen with even lighting and the avoidance of shadow,because it is best to have as narrow a color range as possible for chroma keying.The first step in creating a chroma key is to create a garbage matte.This tutorial will teach you to create a chroma key itself.
Steps To Create A Chroma Key
There are several methods to create a chroma key in after effects.The keylight plugin pre-installed in after effects will help you get the job done faster than any other.But we are going to learn a more advanced technique using the color range option.
- Click on the green screen footage layer in the Timeline panel with the chroma key composition still active.
- Select Effect > Keying > Color Range from the menu bar.
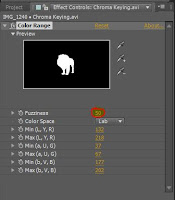
- Select the first eye dropper tool in the effects control panel next to the black and white thumbnail preview.
- Click the green background in the Composition panel.This begins keying out the background.
- Select the second Eyedropper tool with a plus sign next to it in the Effect controls panel.This tool is used to add colors to the color range that the effect removes.
- Click the area in the composition that is still green.
- Set the Fuzziness to 50 in the effect control panel to remove some of the green fringes around it.
Note: In a situation you over select a color you can exclude the color from the color range using the eyedropper with the minus sign.


Blogger Comment
Facebook Comment